In today’s fast-paced digital world, the demand for higher data transmission rates and more efficient network management has never been greater. Enter Coarse Wavelength Division Multiplexing (CWDM) – a technology designed to maximize the capacity of optical networks by transmitting multiple wavelengths on a single fiber. Whether you’re a seasoned telecommunications professional or a curious tech enthusiast, understanding how to connect to CWDM is essential for leveraging its full potential. This guide will walk you through the process, highlighting key considerations and steps to ensure a seamless integration.
Understanding CWDM: The Basics
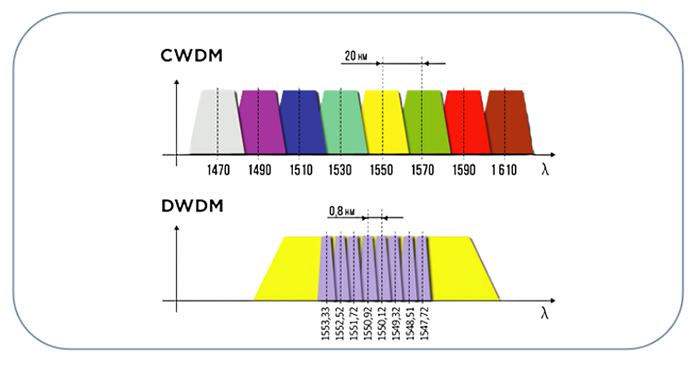
Before diving into the connection process, it’s crucial to grasp what CWDM is and how it works. CWDM is a method of multiplexing optical signals, each at a different wavelength, over a single fiber. This technology is particularly useful in metropolitan area networks (MANs) and access networks due to its cost-effectiveness and efficiency. CWDM typically supports up to 18 channels with wavelengths spaced 20 nanometers apart, covering a spectrum from 1270nm to 1610nm.
Table of Contents
ToggleWhy Choose CWDM?
CWDM offers several advantages that make it an attractive option for modern networks:
- Cost-Effectiveness: CWDM components are generally less expensive than those used in Dense Wavelength Division Multiplexing (DWDM) systems due to their wider channel spacing and reduced complexity.
- Scalability: With the ability to add more channels as needed, CWDM systems can grow with your network demands.
- Simplicity: CWDM systems are simpler to install and maintain, making them ideal for operators with limited technical resources.
Essential Components for CWDM Connection
To connect to a CWDM system, you’ll need the following components:
- CWDM Mux/Demux Units: These devices combine (multiplex) and separate (demultiplex) the optical signals.
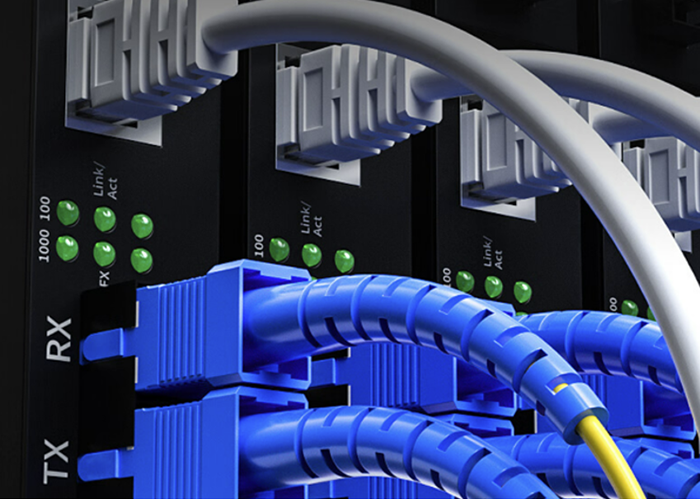
- Optical Transceivers: SFP/SFP+ transceivers that support CWDM wavelengths.
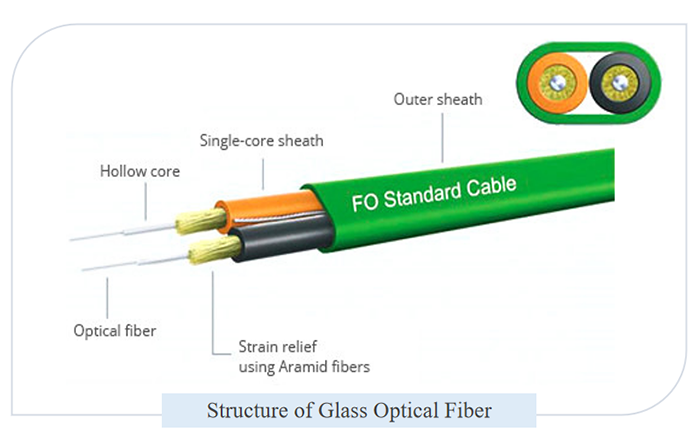
- Optical Fibers: Single-mode fibers are typically used for CWDM due to their low attenuation over long distances.
- Optical Patch Cords: Used to connect the transceivers to the Mux/Demux units.
Step-by-Step Guide to Connecting CWDM
Step 1: Plan Your Network
Begin by mapping out your network. Identify the locations where CWDM will be implemented and determine the number of channels required. This planning phase is crucial for ensuring that your CWDM system meets your current and future needs.
Step 2: Install CWDM Mux/Demux Units
Mount the CWDM Mux/Demux units in a rack or a suitable location within your network infrastructure. Ensure that the units are securely installed and easily accessible for maintenance.
Step 3: Connect Optical Transceivers
Insert the CWDM optical transceivers into the appropriate slots on your network devices (e.g., switches, routers). Each transceiver should correspond to a specific wavelength, as indicated by the color coding on the CWDM Mux/Demux unit.
Step 4: Patch Cords Connection
Use optical patch cords to connect the transceivers to the CWDM Mux/Demux units. Ensure that each transceiver is connected to the correct port on the Mux/Demux unit to avoid wavelength mismatches.
Step 5: Verify Connections
Double-check all connections to ensure that they are secure and properly aligned. This step is critical to prevent signal loss and ensure optimal performance.
Initial Testing and Troubleshooting
Once everything is connected, it’s time to test the system. Use an optical power meter to measure the signal strength at each connection point. If any issues are detected, such as weak signals or no signal, troubleshoot by checking for loose connections, faulty transceivers, or damaged fibers.
In the next part, we’ll delve deeper into optimizing your CWDM system, maintenance tips, and advanced troubleshooting techniques to keep your network running smoothly.
Optimizing Your CWDM System
After successfully connecting your CWDM system, the next step is optimization. Proper optimization ensures that your network operates at peak efficiency, providing high-speed data transmission and robust performance.
Monitoring Signal Quality
Regular monitoring of signal quality is crucial. Use tools like Optical Spectrum Analyzers (OSAs) to measure the performance of each channel. Look for signs of signal degradation, such as increased bit error rates or reduced signal-to-noise ratio. By identifying and addressing issues early, you can prevent significant disruptions.
Balancing Channel Power
Ensure that the power levels of all CWDM channels are balanced. Imbalances can cause some channels to have stronger signals while others are weaker, leading to suboptimal performance. Use variable optical attenuators (VOAs) to adjust and balance the power levels across all channels.
Addressing Fiber Dispersion
Fiber dispersion can affect the quality of your CWDM signals over long distances. Consider using dispersion compensation modules (DCMs) to mitigate these effects. DCMs are designed to counteract the dispersion, ensuring that your signals remain clear and strong.
Maintenance Tips for CWDM Systems
Regular maintenance is key to the longevity and reliability of your CWDM system. Here are some essential maintenance tips:
Routine Inspections
Conduct routine inspections of your CWDM components, including Mux/Demux units, transceivers, and optical fibers. Look for physical damage, dust, or debris that could interfere with signal transmission.
Cleaning Connectors
Clean the connectors regularly using proper cleaning tools and solutions. Dirty connectors can cause signal loss and degrade the performance of your network. Always follow the manufacturer’s guidelines for cleaning procedures.
Firmware and Software Updates
Keep your CWDM equipment’s firmware and software up to date. Manufacturers often release updates that enhance performance, add new features, or fix known issues. Regularly check for updates and install them as needed.
Advanced Troubleshooting Techniques
Even with regular maintenance, issues can arise. Here are some advanced troubleshooting techniques to help you quickly identify and resolve problems:
Using an OTDR
An Optical Time-Domain Reflectometer (OTDR) is a powerful tool for diagnosing issues in optical networks. It can pinpoint the exact location of faults, such as breaks or bends in the fiber, and measure the extent of signal loss.
Checking for Interference
Interference from other optical signals can degrade your CWDM system’s performance. Use an OSA to scan for unexpected signals within your CWDM spectrum. If interference is detected, investigate its source and take steps to eliminate it.
Verifying Equipment Compatibility
Ensure that all components of your CWDM system are compatible with each other. Mismatched transceivers, Mux/Demux units, or patch cords can cause connectivity issues. Verify compatibility by consulting the specifications provided by the manufacturers.
Future-Proofing Your CWDM Network
As technology evolves, so do the demands on your network. Future-proofing your CWDM system involves planning for scalability and upgrades. Consider the following strategies:
Scalability
Design your CWDM system with scalability in mind. Plan for additional channels and higher data rates as your network grows. Ensure that your infrastructure can accommodate these future expansions without significant overhauls.
Staying Informed
Stay informed about advancements in CWDM technology. New developments can offer improved performance, greater efficiency, and new features that enhance your network’s capabilities. Regularly attend industry conferences, webinars, and training sessions to keep your knowledge up to date.
Investing in Quality
Invest in high-quality CWDM components from reputable manufacturers. While it may be tempting to cut costs with cheaper alternatives, quality components offer better performance, reliability, and longevity, ultimately saving you money in the long run.
Conclusion
Connecting to CWDM is a strategic move for any organization looking to enhance its network capacity and efficiency. By understanding the basics, following a structured connection process, and implementing optimization and maintenance practices, you can harness the full potential of CWDM technology. As you navigate the world of optical communication, remember that continuous learning and adaptation are key to staying ahead in this rapidly evolving field. Embrace the possibilities that CWDM offers, and watch as your network reaches new heights of performance and reliability.
Frequently Asked Questions
Q:Can 1G SFP work with 10G SFP
A:Yes, technically, a 1G SFP can physically fit into a 10G SFP port, but it will not work as intended. The mismatch in data rates will likely result in communication errors, link instability, and degraded network performance. Mixing different SFP speeds can lead to potential issues such as data packet loss, increased latency, and network congestion.
To address these issues when mixing 1G and 10G SFPs, it is recommended to use media converters or rate-selectable SFP modules that can adapt to different speeds. These devices can help bridge the gap between different SFP speeds and ensure compatibility within the network.
From a current perspective, with the advancement of technology and the widespread adoption of higher network speeds, it is becoming increasingly important to maintain uniformity in SFP speeds to optimize network performance and reliability. Therefore, it is advisable to avoid mixing 1G and 10G SFPs whenever possible to prevent potential compatibility issues and ensure seamless network operation.
Q:Do Walsun appliances support direct attach cable (DAC)?
A:Yes, Walsun appliances support a passive DAC in release 10.5 and later.
Q:Which port must I insert the DAC into?
A:DAC is inserted into the 10G port on the appliance.
Q:Does the 1G port support a DAC?
A:No. The DAC might fit into a 1G port but is not supported.
Q:How can I order a DAC?
A:Contact your Walsun sales representative to order a DAC.
Q:Can I mix DAC and fiber transceivers on the same appliance?
A:Yes. You can mix DAC and fiber transceivers on the same appliance. Each 10G port supports both options.
Q:Can I mix SFP+ fiber and DAC in ports that are part of the same link aggregation channel?
A:No. There must be symmetry between all elements in the same link aggregation channel.
Q:Which transceivers use the MPO type connector?
A:Only 40G QSFP+ SR4 transceiver and 100G QSFP28 SR4 transceivers use the MPO type connector. All other fiber transceivers use the LC type connector.
Q:Are special adapters required for 25G, 50G, and 100G ports?
A 100G port can support five speeds: 10G, 25G, 40G, 50G, and 100G. 1G speed is not supported on the 100G port. 50G and 100G ports use the same transceiver. The appliance determines the speed, and not the port.
Only 50G/100G (QSFP28) and 40G (QSFP+) transceivers can be directly used on a QSFP28 interface. Use a QSA28 adapter on a QSFP28 interface to use 10G (SFP+) and 25G (SFP28) transceivers.
Related Article:
SFP-CWGE27-80C 1.25G CWDM SFP 1270nm 80km LC SMF DDM Transceiver Module
TRENDnet TEG-MGBS10 Compatible 1000Base LX SFP 1310nm 10km LC SMF DDM Transceiver Module
SFP-GE35-2BX20 1000Base 2 Channels BX BIDI CSFP TX1310nm-RX1550nm 20km LC SMF DDM Transceiver Module
SFP-GE55-ZX 1000Base SFP ZX 1550nm 80km LC SMF DDM Transceiver Module
SFP-DWGE17-120C 1.25G DWDM SFP C17 100GHz 1563.86nm 120km LC SMF DDM Transceiver Module