In today’s digital age, a fast and reliable internet connection is not just a luxury but a necessity. Whether you’re working from home, streaming your favorite shows, or gaming online, a fiber optic network offers unmatched speed and reliability. But how do you connect to a fiber optic network? This guide will walk you through the essential steps to get you online with blazing-fast internet.
Table of Contents
ToggleUnderstanding Fiber Optic Networks
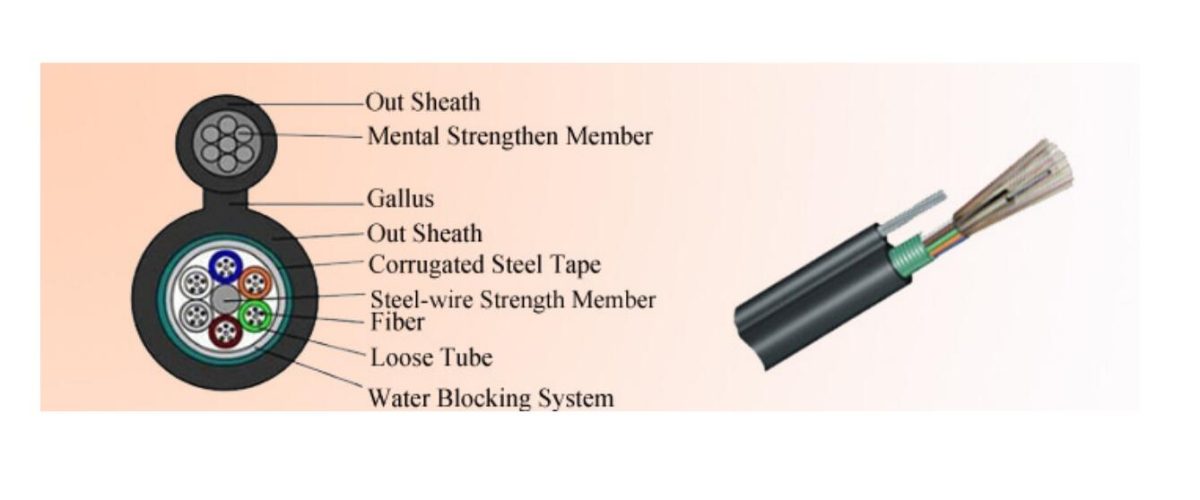
Before diving into the connection process, it’s important to understand what a fiber optic network is and why it’s superior to traditional copper-based connections. Fiber optic cables use light to transmit data, allowing for faster and more efficient data transfer. This technology offers higher bandwidth and lower latency, ensuring smoother and quicker internet experiences.
Step 1: Check Availability
The first step in connecting to a fiber optic network is to check if it’s available in your area. Fiber optic infrastructure is still expanding, and not all regions have access yet. You can check availability by visiting your local internet service provider’s (ISP) website or using online tools that show fiber coverage maps.
Step 2: Choose a Fiber Optic Service Plan
Once you’ve confirmed availability, the next step is to choose a service plan that fits your needs. ISPs offer various plans based on speed and data limits. Consider what you use the internet for—whether it’s basic browsing, HD streaming, or online gaming—and choose a plan that offers sufficient speed and data allowance.
Step 3: Schedule an Installation Appointment
After selecting a plan, you’ll need to schedule an installation appointment with your ISP. Fiber optic installation is more complex than traditional connections and typically requires a professional technician. During the installation, the technician will run fiber optic cables from the street to your home, set up the necessary equipment, and ensure everything is working correctly.
Step 4: Prepare Your Home for Installation
Before the technician arrives, it’s a good idea to prepare your home for the installation. Clear any obstacles around the area where the fiber optic cable will enter your home. Ensure there is easy access to your existing router or modem, as the technician will need to connect the new fiber optic equipment to it.
Step 5: Installation Day
On the day of installation, the technician will arrive with all the necessary equipment. Here’s what to expect during the installation process:
Running the Cable: The technician will run the fiber optic cable from the nearest connection point to your home. This might involve digging a small trench or using existing underground conduits.
Installing the Optical Network Terminal (ONT): The ONT is a device that converts the fiber optic signal into a format that your router can understand. The technician will install the ONT inside your home, usually near where the cable enters.
Connecting to Your Router: The ONT will be connected to your router or modem. The technician will configure the settings to ensure your network is up and running.
Testing the Connection: Finally, the technician will test the connection to ensure everything is working correctly and that you’re getting the speeds promised by your plan.
Congratulations! You’re now connected to a fiber optic network and can enjoy high-speed internet like never before. But there’s more to know to optimize and maintain your connection.
Optimizing Your Fiber Optic Connection
Now that you’re connected to a fiber optic network, you want to ensure you’re getting the most out of it. Here are some tips to optimize your connection and maintain top-notch performance.
1. Upgrade Your Router
The quality of your router can significantly impact your internet experience. If you’re using an outdated router, it might not handle the high speeds provided by your fiber optic connection. Invest in a modern, high-speed router that supports the latest Wi-Fi standards (such as Wi-Fi 6) for the best performance.
2. Position Your Router Strategically
Router placement can affect signal strength and coverage. Place your router in a central location, away from walls and obstructions, to ensure a strong and consistent signal throughout your home. Avoid placing it near other electronic devices that can cause interference.
3. Use Wired Connections for High-Bandwidth Activities
While Wi-Fi is convenient, wired connections offer more stability and speed. For activities that require high bandwidth, such as gaming or streaming 4K videos, connect your device directly to the router using an Ethernet cable. This minimizes latency and ensures a smooth experience.
4. Regularly Update Firmware and Software
Keep your router’s firmware and your devices’ software up to date. Manufacturers release updates to improve performance, security, and compatibility. Regular updates ensure your network is running efficiently and securely.
5. Manage Your Network Traffic
If multiple devices are using your network simultaneously, it can affect performance. Use Quality of Service (QoS) settings on your router to prioritize traffic for critical applications, ensuring that activities like video calls or online gaming get the necessary bandwidth.
Troubleshooting Common Issues
Even with a top-tier fiber optic connection, you might encounter occasional issues. Here’s how to troubleshoot common problems:
1. Slow Speeds
If you’re experiencing slower speeds than expected, first check if the issue is with your ISP. Run a speed test and compare the results with your plan’s promised speeds. If the speeds are significantly lower, contact your ISP for support.
2. Connectivity Drops
Intermittent connectivity can be frustrating. Ensure your router and ONT are in good working condition and properly connected. Check for firmware updates and consider resetting your router to factory settings if the problem persists.
3. Wi-Fi Coverage Issues
If certain areas of your home have weak Wi-Fi signals, consider using Wi-Fi extenders or mesh networks to improve coverage. These devices help eliminate dead zones and provide a consistent signal throughout your home.
Future-Proofing Your Network
Fiber optic technology is continually evolving, and staying updated can help you future-proof your network. Keep an eye on new advancements in fiber optic technology and be ready to upgrade when necessary. This ensures you’ll always have the best possible internet experience.
Conclusion
Connecting to a fiber optic network is a game-changer for anyone seeking high-speed, reliable internet. By following the steps outlined in this guide, you can smoothly transition to fiber optic connectivity and enjoy all the benefits it offers. From the initial installation to optimizing and troubleshooting your network, this guide has you covered. Embrace the future of internet connectivity and experience the difference with fiber optic technology.
With your new fiber optic connection, you’re now equipped to handle the demands of modern digital life with ease. Enjoy the speed, reliability, and performance that only fiber optics can provide, and stay connected like never before.
Frequently Asked Questions
Q:Can 1G SFP work with 10G SFP
A:Yes, technically, a 1G SFP can physically fit into a 10G SFP port, but it will not work as intended. The mismatch in data rates will likely result in communication errors, link instability, and degraded network performance. Mixing different SFP speeds can lead to potential issues such as data packet loss, increased latency, and network congestion.
To address these issues when mixing 1G and 10G SFPs, it is recommended to use media converters or rate-selectable SFP modules that can adapt to different speeds. These devices can help bridge the gap between different SFP speeds and ensure compatibility within the network.
From a current perspective, with the advancement of technology and the widespread adoption of higher network speeds, it is becoming increasingly important to maintain uniformity in SFP speeds to optimize network performance and reliability. Therefore, it is advisable to avoid mixing 1G and 10G SFPs whenever possible to prevent potential compatibility issues and ensure seamless network operation.
Q:Do Walsun appliances support direct attach cable (DAC)?
A:Yes, Walsun appliances support a passive DAC in release 10.5 and later.
Q:Which port must I insert the DAC into?
A:DAC is inserted into the 10G port on the appliance.
Q:Does the 1G port support a DAC?
A:No. The DAC might fit into a 1G port but is not supported.
Q:How can I order a DAC?
A:Contact your Walsun sales representative to order a DAC.
Q:Can I mix DAC and fiber transceivers on the same appliance?
A:Yes. You can mix DAC and fiber transceivers on the same appliance. Each 10G port supports both options.
Q:Can I mix SFP+ fiber and DAC in ports that are part of the same link aggregation channel?
A:No. There must be symmetry between all elements in the same link aggregation channel.
Q:Which transceivers use the MPO type connector?
A:Only 40G QSFP+ SR4 transceiver and 100G QSFP28 SR4 transceivers use the MPO type connector. All other fiber transceivers use the LC type connector.
Q:Are special adapters required for 25G, 50G, and 100G ports?
A 100G port can support five speeds: 10G, 25G, 40G, 50G, and 100G. 1G speed is not supported on the 100G port. 50G and 100G ports use the same transceiver. The appliance determines the speed, and not the port.
Only 50G/100G (QSFP28) and 40G (QSFP+) transceivers can be directly used on a QSFP28 interface. Use a QSA28 adapter on a QSFP28 interface to use 10G (SFP+) and 25G (SFP28) transceivers.